Difference between revisions of "User Interface"
From Conflict of Nations Wiki
| (21 intermediate revisions by the same user not shown) | |||
| Line 1: | Line 1: | ||
__TOC__ | __TOC__ | ||
| − | < | + | <h1>Overview</h1> |
| − | <div | + | <div> |
| − | [[File:UI TABLE ( | + | [[File:UI TABLE(2).jpg|thumb|center|520px|Click on the image for a detailed view.]] |
| − | + | Please find the explanations for each of the LETTERS listed below. | |
| − | |||
| − | |||
</div> | </div> | ||
| − | < | + | <h2> A - Advisor </h2> |
| − | <div | + | <div> |
| − | [[File:Military advisor | + | [[File: Military advisor flipped.png|thumb|class=nolink|left|100px]] |
| − | + | Click on the Advisor image to access the game's tutorial videos. | |
</div> | </div> | ||
| − | < | + | <h2>B - Player Profile </h2> |
| − | <div | + | <div> |
| − | [[File:Player_profile-01-wiki.jpg|thumb|right|500px]] | + | [[File:Player_profile-01-wiki.jpg|thumb|right|500px|Click on the image for a detailed view.]] |
The Player Profile keeps count of your [[Victory|Victory Points]] and displays the in-game day of the campaign. | The Player Profile keeps count of your [[Victory|Victory Points]] and displays the in-game day of the campaign. | ||
| − | < | + | <ul> |
| − | From here you can access the [[News]], [[Research]], [[Status|Diplomatic Status]], [[Coalition|Coalitions]] and [[Events]] that occur in the game. | + | <li> From here you can access the [[News]], [[Research]], [[Status|Diplomatic Status]], [[Coalition|Coalitions]] and [[Events]] that occur in the game. |
| + | </ul> | ||
</div> | </div> | ||
| − | < | + | <h2>C - Settings & Info panel </h2> |
| − | <div | + | <div> |
| − | [[File:Settings button (1).jpg|thumb|right|500px]] | + | [[File:Settings button (1).jpg|thumb|right|500px|Click on the image for a detailed view.]] |
Toggle different map overlays to aid your strategic planning. For example, turning on <b>Terrain Type</b> makes it much easier to plan troop movements. | Toggle different map overlays to aid your strategic planning. For example, turning on <b>Terrain Type</b> makes it much easier to plan troop movements. | ||
| − | < | + | <ul> |
| − | Most overlays are disabled when a new one is toggled. | + | <li> Most overlays are disabled when a new one is toggled. |
| + | </ul> | ||
</div> | </div> | ||
| − | < | + | <h2>D - Chat client </h2> |
<div> | <div> | ||
| − | The | + | The in-game chat client will allow you to communicate with players inside, and outside of your game. Each tab is accessible by all players respective to the channel they present. Ingame messages will only be viewable by players in the same game, Help is viewable by everyone, Security Council only to members etc. |
</div> | </div> | ||
| − | < | + | <h2>E - Army bar/Province bar</h2> |
| − | <div | + | <div> |
| − | [[File:Province Bar-01.jpg|thumb|right|500px]] | + | [[File:Province Bar-01.jpg|thumb|right|500px|Click on the image for a detailed view.]] |
This panel is context-sensitive, its function changes depending on your selection. | This panel is context-sensitive, its function changes depending on your selection. | ||
| − | < | + | <ul> |
| − | When you select a unit, you will see the <b>Army Bar</b>. From here you can issue attack commands, split units, and study their stats. | + | <li> When you select a [[Units|unit]], you will see the <b>Army Bar</b>. From here you can issue attack commands, split units, and study their stats. |
| − | < | + | <li> When you select a [[Provinces|province]]/[[Provinces #Cities|city]], you will see the <b>Province Bar</b>. From here you can mobilise units, construct buildings, and view province/city details such as [[Provinces #Terrain Types|terrain type]], [[Production|production]], and [[Provinces #Morale|morale]]. |
| − | When you select a province/city, you will see the <b>Province Bar</b>. From here you can mobilise units, construct buildings, and view province/city details such as terrain type, production, and morale. | + | </ul> |
</div> | </div> | ||
| − | < | + | <h2>F - City Panel</h2> |
| − | <div | + | <div> |
| − | [[File:CITY LIST-01.jpg|thumb|500px|right]] | + | [[File:CITY LIST-01.jpg|thumb|500px|right|Click on the image for a detailed view.]] |
The City Panel lists all your [[Provinces #Cities|cities]]. From here you can construct buildings and mobilise [[Units|units]]. This panel allows you to multi-select cities and queue the same buildings/units for production at the same time. | The City Panel lists all your [[Provinces #Cities|cities]]. From here you can construct buildings and mobilise [[Units|units]]. This panel allows you to multi-select cities and queue the same buildings/units for production at the same time. | ||
| − | < | + | <ul> |
| − | Note that you cannot mobilise [[Units|units]] in [[Provinces #Cities|cities]] that you have not [[Provinces #Annexed City|annexed]] yet, and the mobilisation button will not be displayed. | + | <li> Note that you cannot mobilise [[Units|units]] in [[Provinces #Cities|cities]] that you have not [[Provinces #Annexed City|annexed]] yet, and the mobilisation button will not be displayed. |
| − | < | + | <li> You can also see the progress of mobilisation/construction, the buildings that are already constructed in a city, and what [[Production #Resources|resources]] are being produced. |
| − | You can also see the progress of mobilisation/construction, the buildings that are already constructed in a city, and what [[Resources|resources]] are being produced. | + | </ul> |
</div> | </div> | ||
| − | < | + | <h2>G - Resource</h2> |
| − | <div | + | <div> |
| − | [[File:Screen Shot 2018-02-19 at 14.19.37.png|thumb|right|500px]] | + | [[File:Screen Shot 2018-02-19 at 14.19.37.png|thumb|right|500px|Click on the image for a detailed view.]] |
| − | The resource panel will keep you up to date on the acquisition rate of resources | + | The resource panel will keep you up to date on the acquisition rate of resources. |
| + | <ul> | ||
| + | <li> Hover over a resource to see what is consuming it at what rate. | ||
| + | </ul> | ||
</div> | </div> | ||
| − | < | + | <h2>H - Market </h2> |
<div> | <div> | ||
| − | + | Click on the [[#G - Resource|resource bar]] to access the market. Here you can see offers provided by the AI and other players. Offers under the same price are grouped together. | |
| + | <ul> | ||
| + | <li> The "My Trades" tab shows your current outstanding offers, and transaction history. | ||
| + | </ul> | ||
| + | <h3 > Selling on the Market </h3> | ||
| + | <div> | ||
| + | [[File:Market Tab.png|thumb|500px|right|Click on the image for a detailed view.]] | ||
| + | When selling on the market, the resource you are willing to sell is taken and placed on the market. This means that you will see this resource being deducted from your resource tab and put in the "My Trades" Tab in the market section. If you would like your resource back, just abort the sell offer. It is very important to note that the market will always sell to the highest bidder. | ||
| + | </div> | ||
| + | </div> | ||
| + | |||
| + | <h2>I - Intel</h2> | ||
| + | <div> | ||
| + | [[File:UNITS REVEALED.jpg|thumb|right|500px|Click on the image for a detailed view.]] | ||
| + | The intel panel displays intelligence related to the selected [[Provinces|provinces]], and allows you deploy agents. | ||
| + | <ul> | ||
| + | <li> Recruit agents and send them on missions, including intelligence gathering, spreading corruption, and sabotage. | ||
| + | <li> When you reveal enemy units, you will only see their positions and orders at the time the intel was gathered. | ||
| + | <li> Revealed units will remain visible until midnight of the current ingame day. | ||
| + | </ul> | ||
</div> | </div> | ||
| − | < | + | <h2>Unit Info Panel</h2> |
| − | <div | + | <div> |
| − | [[File: | + | [[File: Unit info-01.png|thumb|right|500px|Click on the image for a detailed view.]] |
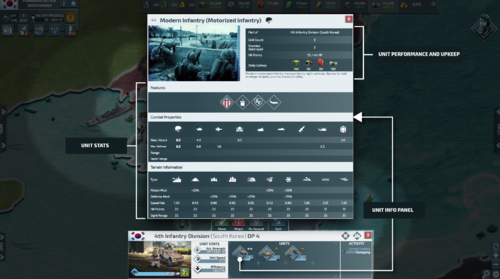
| − | + | You can view a unit's [[Units #Basic Unit Stats|basic stats]] via the Unit Info Panel. It provides detailed information about a unit such as its [[Units #Combat Properties|combat properties]] and [[Units #Terrain Information|terrain information]]. | |
</div> | </div> | ||
Latest revision as of 05:23, 17 May 2019
Contents
Overview
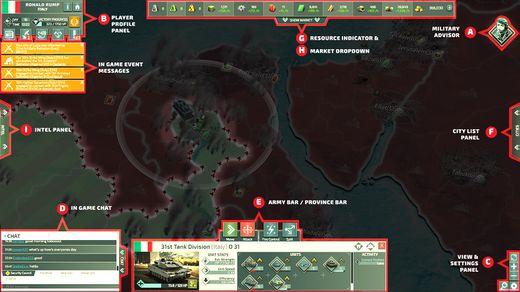
Please find the explanations for each of the LETTERS listed below.
A - Advisor
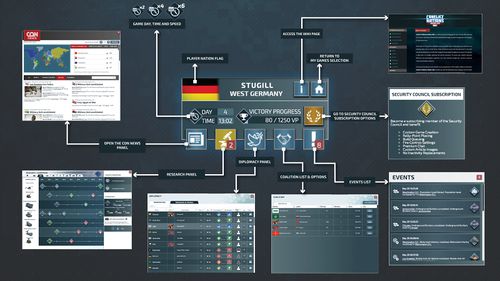
B - Player Profile
The Player Profile keeps count of your Victory Points and displays the in-game day of the campaign.
- From here you can access the News, Research, Diplomatic Status, Coalitions and Events that occur in the game.
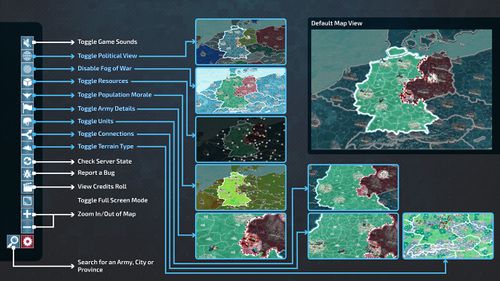
C - Settings & Info panel
Toggle different map overlays to aid your strategic planning. For example, turning on Terrain Type makes it much easier to plan troop movements.
- Most overlays are disabled when a new one is toggled.
D - Chat client
The in-game chat client will allow you to communicate with players inside, and outside of your game. Each tab is accessible by all players respective to the channel they present. Ingame messages will only be viewable by players in the same game, Help is viewable by everyone, Security Council only to members etc.
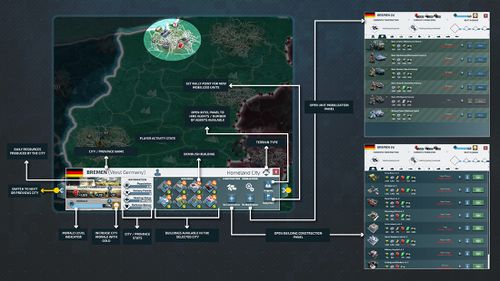
E - Army bar/Province bar
This panel is context-sensitive, its function changes depending on your selection.
- When you select a unit, you will see the Army Bar. From here you can issue attack commands, split units, and study their stats.
- When you select a province/city, you will see the Province Bar. From here you can mobilise units, construct buildings, and view province/city details such as terrain type, production, and morale.
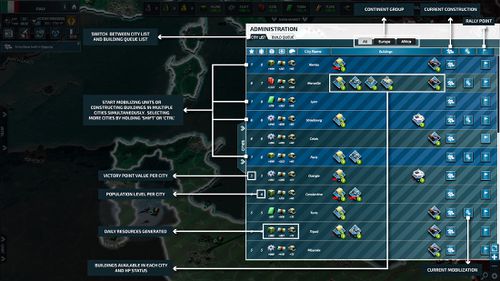
F - City Panel
The City Panel lists all your cities. From here you can construct buildings and mobilise units. This panel allows you to multi-select cities and queue the same buildings/units for production at the same time.
G - Resource
The resource panel will keep you up to date on the acquisition rate of resources.
- Hover over a resource to see what is consuming it at what rate.
H - Market
Click on the resource bar to access the market. Here you can see offers provided by the AI and other players. Offers under the same price are grouped together.
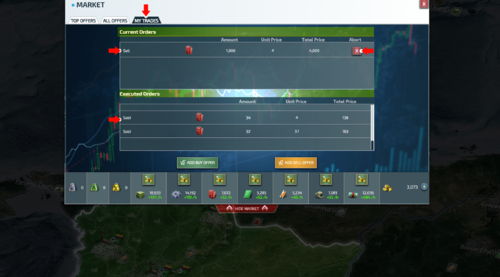
- The "My Trades" tab shows your current outstanding offers, and transaction history.
Selling on the Market
When selling on the market, the resource you are willing to sell is taken and placed on the market. This means that you will see this resource being deducted from your resource tab and put in the "My Trades" Tab in the market section. If you would like your resource back, just abort the sell offer. It is very important to note that the market will always sell to the highest bidder.
I - Intel
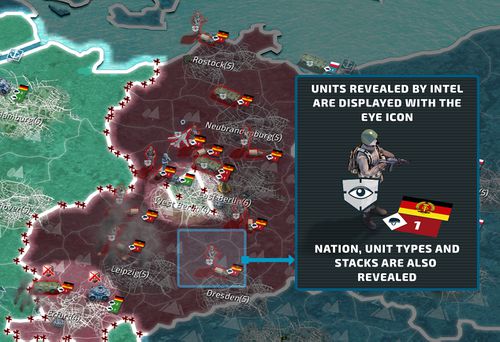
The intel panel displays intelligence related to the selected provinces, and allows you deploy agents.
- Recruit agents and send them on missions, including intelligence gathering, spreading corruption, and sabotage.
- When you reveal enemy units, you will only see their positions and orders at the time the intel was gathered.
- Revealed units will remain visible until midnight of the current ingame day.
Unit Info Panel
You can view a unit's basic stats via the Unit Info Panel. It provides detailed information about a unit such as its combat properties and terrain information.
